Jul 04 2010
Happy 4th of July!
Happy 4th of July! I already saw fireworks on Friday – thankfully, our Elver Park fireworks were saved this year by Woodman’s Grocery Stores, who have committed to sponsoring the event for the next several years. Yay! They aren’t the big area display (that’s Rhythm and Booms, the largest fireworks display in the Midwest), but it doesn’t take hours to leave the park, either, so they are my display of choice.
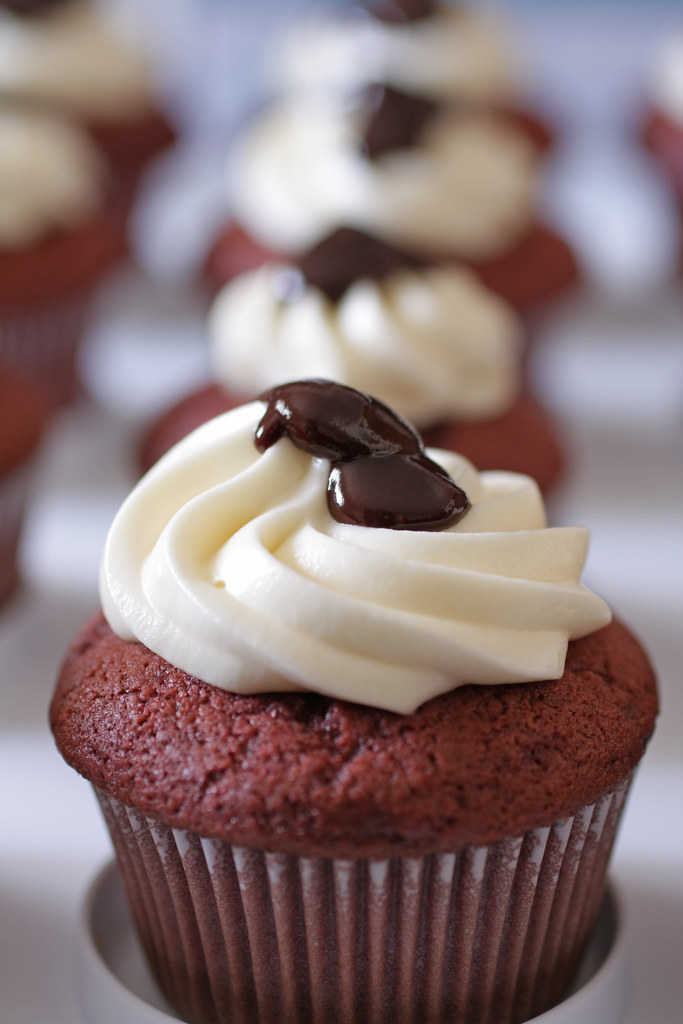
One of my favorite recipes to take along to 4th of July parties has to be red velvet cupcakes. Because this year I opted for a version of my Simple Fruit Salad instead, made with peaches, plums, blueberries, green grapes, and strawberries, I thought I would repost my favorite recipe for Red Velvet Cupcakes – instead of decorating with ganache, I would go with red, white, and blue sprinkles for the fourth, or even blueberries and raspberries or strawberries.
Red Velvet Cupcakes
recipe adapted from Pinch My Salt
2 1/4 cups all purpose flour
1/4 cup cornstarch
1 teaspoon baking powder
1 teaspoon salt
2 tablespoons unsweetened cocoa powder
red food color paste
1/2 cup unsalted butter, softened
1 1/2 cups sugar
2 eggs, at room temperature
1 teaspoon vanilla extract
1 cup buttermilk, at room temperature
1 teaspoon white vinegar
1 teaspoon baking soda
1. Preheat oven to 350 degrees. Line two 12-cup muffin tins with cupcake papers.
2. Sift together the flour, cornstarch, cocoa powder, baking powder, and salt into a medium bowl; set aside.
3. Using a stand mixer fitted with a paddle attachment, beat butter and sugar on medium speed until light and fluffy. Add eggs, one at a time, then beat in vanilla and a squirt of red food coloring paste, scraping down the bowl with a spatula as you go. Add one third of the flour mixture to the butter, beat well, then beat in half of the buttermilk. Beat in another third of flour, then the rest of the buttermilk, ending with the last of the flour. Scrape down bowl with a spatula and fold the batter a couple of times to ensure it’s well-blended. If desired, add more red food coloring paste and mix well to combine.
4. In a small bowl, mix vinegar and baking soda. Add vinegar mixture to the cake batter and stir well with spatula to combine. Using an ice cream scoop, fill cupcake cups with cake batter (they should be 2/3 full). Place muffin tins on the middle rack of a preheated 350 degree oven. Bake for approximately 20-24 minutes, rotating pans halfway through. Cupcakes are done when a toothpick inserted in the center comes out clean.
5. Cool the cupcakes completely before frosting.
Cream Cheese Frosting
16 oz. cream cheese, softened
1/2 cup unsalted butter, softened
1 teaspoon vanilla extract
2 3/4 cups powdered sugar, sifted
pinch of salt
Beat butter and cream cheese on medium speed with paddle attachment until combined. Reduce speed to low and slowly add powdered sugar. Add vanilla and beat until mixed, then add a pinch of salt and mix. Frost each cupcake with a knife, or use a decorator bag.
Chocolate Ganache
1/4 cup semi-sweet chocolate chips
1/4 cup heavy cream
Combine chocolate chips and heavy cream in a small bowl. Microwave on defrost level (or lowest setting), stirring every 30 seconds until chocolate is smooth. Drizzle or dollop ganache on top of cupcakes.
Enjoy!


these look amazing… thank you for this recipe.
The pictures are just awesome and your site is beautiful.
Just wondering if this recipe or the shockingly red ‘red velvet cupcakes’ which you’ve previously posted are better? I’ve made the other recipe and thought it delicious and don’t know whether to try this one or not. Your recipes are lovely – thanks for sharing!
Honey – thank you very much.
Nicole – I like this recipe better. The cupcakes are lighter but still moist, whereas the ‘shockingly red’ cupcakes are more dense from all of the oil. It really depends on the texture you’re going for, I think. This recipe is definitely worth trying, so you can make your own comparison.
I must thank you for the efforts you have put in writing
this site. I am hoping to see the same high-grade blog posts from
you in the future as well. In truth, your creative writing abilities has inspired me to get
my very own blog now 😉
Cool blog! Is your theme custom made or did you download it from somewhere?
A theme like yours with a few simple tweeks would really make my blog jump
out. Please let me know where you got your theme.
Thanks